With Generative AI being the current game changer for everyday consumer and industrial needs, Large Language Models (LLMs) have been popping up one after another. As an aftermath of the same, we are currently witnessing an LLM master race with a literal billboard chart. There is a strong community adoption and growth which benefits the overall LLM ecosystem both for research and enterprise needs.
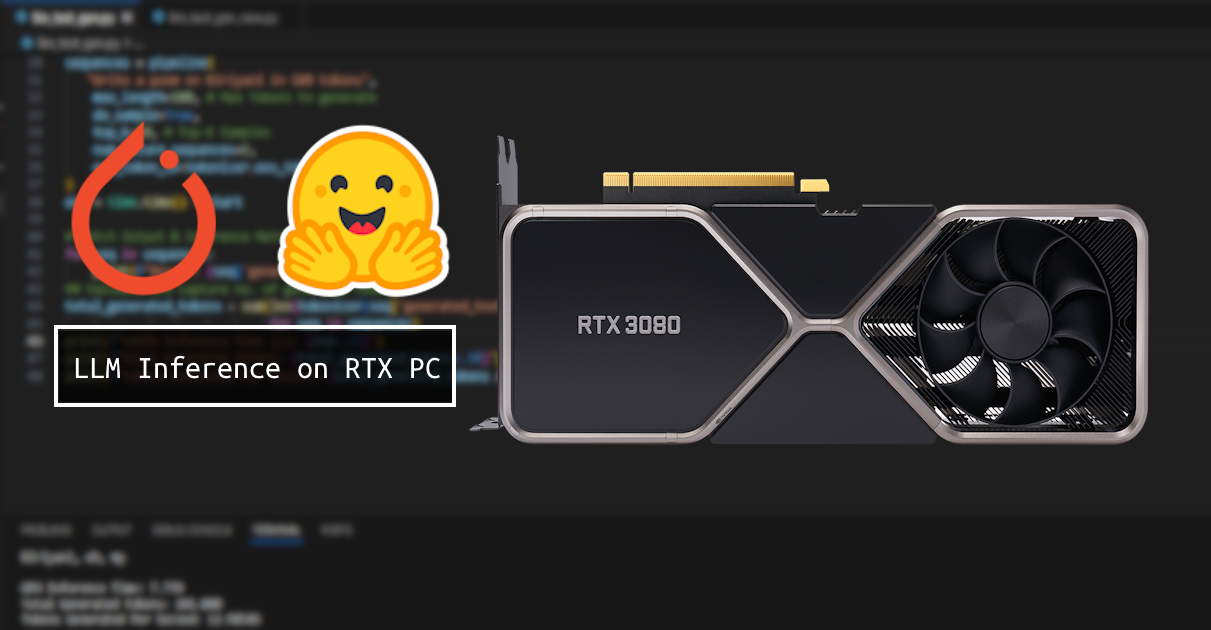
In this blog series, we’ll explore the fascinating realm of Large Language Models (LLMs) and how you can harness the power of your NVIDIA RTX GPU to run LLMs efficiently for Text Generation tasks. In Part 1, we’ll focus on leveraging Hugging Face, a popular open-source platform for natural language processing.
Popular Compute Optimized LLMs
Before diving into the technical details, let’s briefly explore some of the compute-optimized Large Language Models available. Models like GPT-4, Llama2 70B, PaLM2 and Claude2 have set the pace for industrial adoption serving a huge number of end-users and enterprises. However, compute cost is a concern for training and running these powerful LLMs for inference.
There was a certain time when we could experiment with such LLMs on heavy-duty data-center GPUs like the NVIDIA A100 or AMD Mi Instinct series. Thanks to continued research on optimizing LLMs, there are avenues to experiment (mostly inference based) and run LLMs on your local workstation.
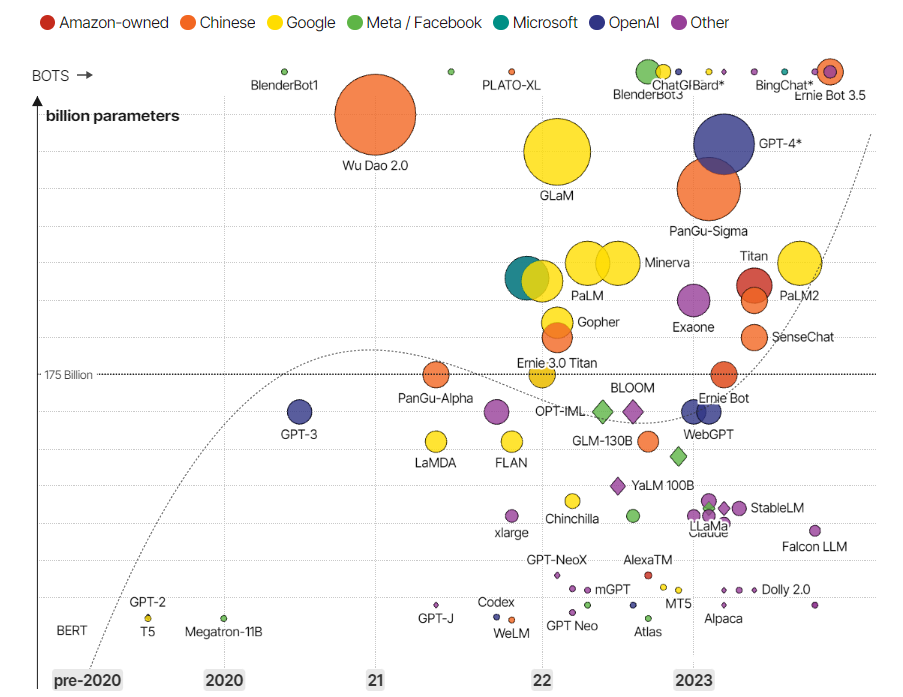
There are multiple compute-optimized open-source LLMs available in Hugging Face repository at your disposal. The graph above depicts some of them. From a layman perspective, to load an LLM on a GPU there are two constraints: GPU memory and model compute precision (FP16/BF-16/INT8). Models like say for instance Llama2-7B and 13B variants can be easily handled by NVIDIA RTX GPUs for inference, when they are loaded in a quantized precision mode. A GPU memory of at least 10 GB is recommended which we shall elucidate in the next section.
Pre-Requisites & Installation
Hardware
- GPU: Nvidia RTX GPU 3000 series onwards with at least 10 GB Plus VRAM
- CPU: At least mid-range Octa-Core CPU (AMD Ryzen 5 or 7 Gen 2+ onwards/Intel 11th or 12th gen equivalent)
- RAM: 16 GB
- SSD: 256 GB (Recommended)
It is the GPU VRAM and model quantization that shall play a key-role in model load and inference. For instance, a 4-bit quantized Llama2-7B is of roughly 4GB in size. Hence, the same amount of GPU memory shall be required to load the model weights. Next, we need to also take into account the memory required for inference compute and KV cache.
By thumb rule at least 1.5x the size of model weights is required in memory for loading an LLM transformer and its inference. Hence, in this case we would require around 6GB. However, yet again it is advisable to keep some buffer memory for other tasks. Hence, around 8 GB of GPU memory case shall suffice in this scenario. But if you want to take the game a bit higher, say Llama2 13B then around 10 GB of GPU VRAM is a must.
To load models with bigger size, it’s advised to look into quantization techniques. The following paper and blog elucidate LLM memory requirements in more depth.
To run LLMs, it’s mostly the GPU compute and memory that is primarily considered. However, a good CPU also needs to be paired with a high-performant GPU to avoid any bottleneck issues. Furthermore, apart from basic operations, CPUs can play a key role in data loading and also transfer of some minimal compute offloaded from GPUs.
A minimum of 16 GB of RAM is required for any generic AI/Gaming workstation these days. Hence, it’s a must have. An SSD is not mandatory but essential for faster data loading and storage.
Software
Following pre-requisites are assumed to be available in your system. In case it’s not, please visit the hyperlinks to refer the necessary installation guides for the same.
- Latest CUDA toolkit (12+): Windows | Linux
- Anaconda
- Git
- Git Large File Storage
Installation
Conda Environment Creation
To keep things simple, we shall setup a Conda environment to help you get started easily. An independent environment is recommended rather than installing in your local OS directly. This is necessary to avoid package build and version mismatch issues with your existing python packages. Refer the code snippet below to create and activate your Conda environment by using PowerShell/CMD. We recommend integrating an IDE like VSCode for more efficiency and ease of use.
## 1. Initialize Conda Environment
conda init
## 2. Create Conda Environment
conda create -n rtx-llm python=3.9
## 3. Activate Conda Environment
conda activate rtx-llm
Packages Installation
Before we get started with getting our hands dirty with the Python code to run LLMs for inference, we need to install some packages in our Conda environment.
# Replace XXX with CUDA version
pip install -q torch --index-url https://download.pytorch.org/whl/cuXXX
# Example
## pip install -q torch --index-url https://download.pytorch.org/whl/cu121
pip install -q "transformers" "optimum" "auto-gptq" "accelerate" "safetensors"
Make sure you install the corresponding PyTorch version that supports the version of CUDA installed in your system. To check installation combabilities, refer the official link.
Rather than going for specific versions, it’s recommended to have a latest version of the packages mentioned in Line 5 above. Other than the obvious transformers package, following are the roles played by the other libraries.
- Optimum – An extension for Hugging Face transformers responsible for integrating and adding support corresponding libraries with various hardware partners.
- Auto-GPTQ – A library that enables the use of GPTQ algorithm in a simpler and intuitive way. It’s optional as we will be directly loading GPTQ weights from already quantized LLMs. However, it’s a good to have if you want to fine-tune a small language model and save compute resources.
- Accelerate – Although it may not be required to run LLMs for inference only, it’s a good to have package. It’s primarily meant for making distributed training with your hardware kernel easier. We do believe, it may be helpful for in validation loops.
- SafeTensors – Recommended Hugging Face library which acts as a safe and efficient format for saving/loading model tensors in contrast to pickle.
Model Clone
There are various ways to download and run LLMs from Hugging Face. We recommend cloning the models to your local device directly rather than downloading the models on the fly while running the code. This will save you a lot of time, when you want to train or run LLMs. The git commands below shall help you clone your desired model from HF repository directly. In this case we shall clone the 4-bit GPTQ quantized version of Llama2-13B Chat LLM.
# Initialize Git Large File Storage
git lfs install
# Clone to the same directory where you will write inference code
git clone https://huggingface.co/TheBloke/Llama-2-13B-chat-GPTQ
Building a Simple Text Generation Pipeline
Great! Now we have all the raw materials ready. It’s time for us to stitch the components involved in building a Hugging Face text generation pipeline. We will be learning how to load an LLM and its tokenizer. Followed by that, we shall initialize a Hugging Face transformers pipeline. This pipeline will then help us to run LLMs for inference by defining necessary hyper-parameters. We shall then record a few metrics to evaluate the model performance in terms of compute cost. Let’s dive in!
Loading Model & Tokenizer
Since, we have already downloaded the model, we just need to provide the absolute path for the same. This needs to be specified when we are initializing the model and the tokenizer. We have set the device map as “auto” for letting the HF modules decide the compute device. It will be automatically set to “CUDA:0” which is the compute device in our case. This device_map is helpful in case of multi-gpu inference/training. You can learn more about the use of device_map here.
# Import Libraries
from transformers import AutoTokenizer, AutoModelForCausalLM, GPTQConfig
import transformers
import torch, time

# Loading Model & Tokenizer
model_id = "E:\LLM\Llama-2-13B-chat-GPTQ"
## Free GPU Memory
torch.cuda.empty_cache()
## Load Tokenizer
tokenizer = AutoTokenizer.from_pretrained(model_id)
"""Below 2 lines are optional
quantization_config = GPTQConfig(bits=4,tokenizer=tokenizer)
model = AutoModelForCausalLM.from_pretrained(model_id,
device_map="auto",
quantization_config=quantization_config,
trust_remote_code=True)"""
## Load Model
model = AutoModelForCausalLM.from_pretrained(model_id, device_map="auto",
trust_remote_code=True)
Building the Hugging Face Pipeline
Consequently, we shall need to define the Transformers pipeline for text-generation using the LLM we are going to load, as mentioned earlier. Next, we need to provide the necessary hyper-parameters to be used by the decoder of the LLM to generate text. We have provided a prompt to make you feel hungry and order some Biriyani. Please do order for us too! The max_length hyper-parameter is set as 100 to minimize the compute load and check results quickly. This is one way to build a text-generation pipeline. You can implement the same with GenerationConfig module as well.
# Build The HF Pipeline
## Initialize HF Transformer Pipeline Object
pipeline = transformers.pipeline(
    "text-generation",
    model=model,
    tokenizer=tokenizer,
    trust_remote_code=True,
    device_map="auto",
)
## Record compute time
start = time.time()
## Provide LLM Hyper-Params for Inference
sequences = pipeline(
   "Write a poem on Biriyani in 100 tokens",
    max_length=100, # Max Tokens to generate
    do_sample=True, # Enables sampling from probability distribution
    top_k=10, # Top-K Samples
    num_return_sequences=1,
    eos_token_id=tokenizer.eos_token_id,
)
end = time.time() - start
Fetching Output & Inference Metrics
That’s it! There is just one final step to perform, as you conquer the knowledge of how to run LLMs on your own GPU rig. We can fetch the output from generated sequences and can capture some of the inference metrics.
# Fetch Output & Inference Metrics
for seq in sequences:
    print(f"Result: {seq['generated_text']}")
## Validate and capture no. of generated tokens
total_generated_tokens = sum(len(tokenizer(seq['generated_text'])['input_ids'])
                             for seq in sequences)
print(f"\nGPU Inference Time (s): {end:.3f}")
print(f"Total Generated Tokens: {total_generated_tokens:.3f}")
print(f"Tokens Generated Per Second: {total_generated_tokens / end:.5f}")
For this tutorial, we are recording only three metrics, and we shall do it manually. However, we highly recommend the use of tools like Wandb or Neptune.ai to capture a time-series of metrics. The metrics that we are recording are GPU inference compute time, tokens generated per second and GPU memory consumed. So, what results did we get for one inference?
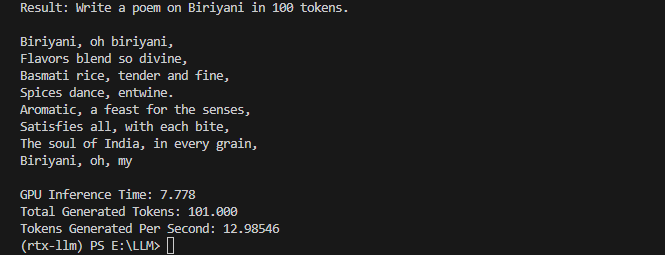
We can see a nice alluring short poem which shall be completed by the LLM as you order one biriyani for us. Jokes aside, we can observe some good results on our RTX 3080 rig. We just ran an LLM like Llama2 with 13B params within 10GB of GPU RAM! Bravado! Similarly, we encourage you to run some additional LLMs and validate the metrics as well to become more familiar with this process and explore more interesting stuff as you deep-dive!
More Inference & Benchmark Results
So far, we experimented with the Llama2-13B quantized model. We also encouraged you to have fun and try some more LLMs. To motivate you furthermore, we explored some GPTQ models in HF repository and played around with them. The graph below depicts the inference metrics for the same.
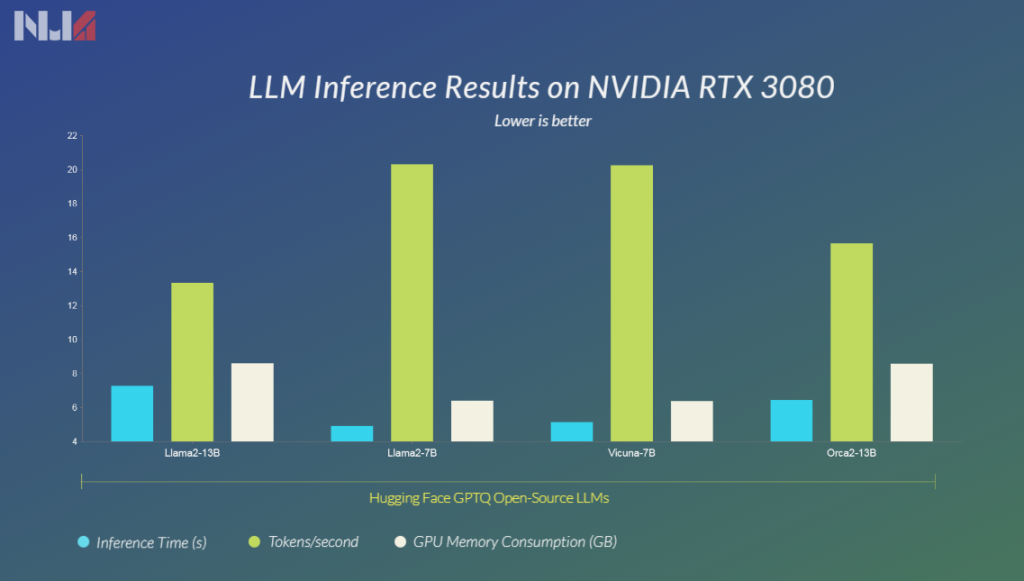
In our benchmarks, we concluded that both the variants of Llama2 (7B & 13B) performed really well. It was not just in terms of inference metrics but also taking into account the quality of output generated. The Orca2-13B although exhibits a lower inference time and memory consumption, is not trained on general conversations. Maybe, it needs to be finetuned furthermore with general data to showcase better quality of output. However, it has good potential.
So, finally we have conquered a good amount of basic knowledge including a hands-on approach to play around with Open Source LLMs. We also discovered that consumer grade GPUs can also run LLMs. Hence, this could open doors to a plethora of research ideas and implementations.
We strongly encourage you to keep learning more and watching us out for content in this space. Together we shall generate loads of fun and mutual learning takeaways! Let us know your thoughts in the comments section.